Search This Blog

Showing posts with label dessert. Show all posts

Sunday, July 21, 2013

Two Ingredient Lemon Bars

SO EASY ... I made these this morning and they are delish!

TWO INGREDIENT LEMON BARS
This is all you need:
 1 box angel food cake mix
 2 cans lemon pie filling
       (I used the 15 oz. cans)
Mix dry cake mix and cans of pie filling together in large bowl. Mixed it by hand.

Pour into greased 9 x 13″ baking pan.
Bake at 350 degrees for 25 minutes (or a little longer) or until top is starting to brown.  Store in fridge. Sprinkle a little powdered sugar on top before serving.

(I must credit FB with this recipe.)

Monday, May 28, 2012

Fruit Pizza

FRUIT PIZZA

"CRUST":
1 tube of Pillsbury Sugar Cookie dough
Spread cookie onto a pizza pan or you can use a regular cake pan
Bake a 350 until cookie is nice and brown. It takes longer than you think it will. Let cookie cool in the pan. Use a spatula to lift cookie from the pan as it is cooling to make sure it doesn't stick. 

 "SAUCE":
1 cube cream cream cheese at room temp. (you can use reduced fat if you want)
1 tsp vanilla
Powdered sugar.  I don't measure my powdered sugar but start with one cup and keep adding until it is as sweet as I want.
I sometimes add a scant amount of milk or orange juice if I get too much powdered sugar mixed in.

Spread the frosting on the cookie. 

Add your favorite fresh fruit. Go crazy with the design!  This pizza is better when it has been sitting in the fridge for a couple of hours and it is over-the-top good the next day!

ENJOY!!!


July 2012 update:  Nancy and I made some "mini" fruit pizzas to take to a bbq.  They turned out very nicely but they get soggy fairly quickly so I think I'd make the cookies a bit thicker next time and make them up just before I'm heading out the door to any event with them or before serving to company.

Sunday, October 2, 2011

Amish Friendship Bread

You have to receive a starter from a friend.
Amish Friendship Bread

DON'T use any type of metal spoon or bowl for mixing.
DON'T refrigerate
If air gets in the bag, let it out. It's normal for the batter to rise, bubble, and ferment.

First, you must receive a starter from a friend or go to the link I provided below to make your own starter. Someone gave me a starter last Sunday and I was so happy to receive it. I haven't made this bread in 20 years.
  • Day 1: Do nothing. (This is the day you receive the batter. Go by the date on the bag.)
  • Day 2: Smush the bag.
  • Day 3: Smush the bag.
  • Day 4: Smush the bag.
  • Day 5: Smush the bag.
  • Day 6:  Add to the bag: 1 cup flour, 1 cup sugar and 1 cup milk, then smush the bag.
  • Day 7: Smush the bag.
  • Day 8: Smush the bag.
  • Day 9: Smush the bag.
  • Day 10: Follow the instructions below:
1. Pour the entire contents of the bag into a large, NON-METAL bowl.
2.  Add 1 1/2 cups flour, 1 1/2 cups sugar, and 1 1/2 cups milk.
3. Measure out 4 separate batters of 1 cup each and pour into four 1 gallon ziploc bags. Keep a starter for yourself and give the other 3 to friends along with a copy of this recipe.  Be sure to let the friend know which day it is that you are giving it to them. It's helpful to write the date for the friend to know which day it is that you are giving it to them. It's helpful to write the date for Day 1 on the bag.
4. Preheat oven to 325 degrees.
5. To the remaining batter in the bowl, add:
  • 3 eggs
  • 1 cup oil (or 1/2 cup oil and 1/2 cup applesauce)
  • 1/2 cup milk
  • 1 cup sugar
  • 2 tsp cinnamon
  • 1/2 tsp vanilla
  • 1 1/2 tsp baking powder
  • 1/2 tsp baking soda
  • 1/2 tsp salt (you can omit)
  • 2 cup flour
  • 1 large box of instant vanilla pudding
6.  Grease 2 large loaf pans. Mix together an additional 1/2 cup sugar and 1 1/2 tsp cinnamon in a bowl. Place half of the sugar mixture in the greased pans.
7. Pour the batter evenly into the 2 pans and sprinkle the remaining sugar mixture over the top.
8. Bake 1 hour. Cool until the bread loosens from the pan evenly (about 10 minutes). Turn out onto serving dish. Serve warm or cold

*If you keep a starter for yourself, you will be baking every 10 days. The bread is very good and makes a great gift. If you give all your starter away, you will have to wait until someone gives YOU one back! If you want to make your own starter, go to: Amish Friendship Bread Starter

NOTE: I used two small packages of Butterscotch pudding mix in place of the large box of vanilla and it turned out beautiful and Gene loves it. The friend who gave me the starter used Lemon pudding and I thought it was most excellent. Get creative!

    Sunday, September 18, 2011

    Peach Crumb Bake

    PEACH CRUMB BAKE


    2 cups peaches (sliced fresh or canned)
    1 tablespoon corn starch
    1 tablespoon white sugar
    3 tablespoons graham cracker crumbs
    1/4 tsp cinnamon
    1 dash ground nutmet
    1 tsp butter

    Preheat oven to 350 degrees. Layer peaches in bottom of 8" square baking dish and sprinkle with sugar and corn starch. Mix remaining ingredients and sprinkle mixture over peach slices.  Bake 15 minues. Serve warm or chilled.

    (I got this recipe off the internet and there was no name to attribute the recipe to but I changed it up a bit to make it my own. This is so easy to make I think it may become a replacement for my crisp recipes.)

    SUSAN'S NOTES: I added the corn starch and sugar to the peaches because I don't like how soupy the peaches get when they're baked without corn starch.  You can leave the sugar out but without any sugar in the graham crackers, I was afraid it was going to be too tart.  It was a hit with Gene! I think this will be excellent with apples also.

    Peach Upside Down Cake

    This cake used fresh peaches
    Peach Upside Down Cakie

    Copied from Allrecipes.com
    Submitted by: Judy Wilson

    INGREDIENTS:

    1/4 cup butter
    1/2 cup packed light brown sugar
    1/4 tsp ground nutmeg
    5 fresh peaches, peeled, pitted and sliced


    1/2 cup butter, softened
    1/2 cup white sugar
    1 egg
    1 1/4 cup all-purpose flour
    2 tsp baking powder
    1/2 tsp salt (I omitted)
    1/2 cup milk


    DIRECTIONS:
    1.  Melt 1/4 cup butter or margarine in an 8" square pan. Sprinkle with brown sugar and nutmeg. (I added a little cinnamon also).  Arranged peach slices in pan.

    2. In a large bowl, cream the butter and sugar until light and fluffy. Beat in egg. Stir together flour, baking powder and salt. Add flour mixture to creamed mixture alternately with milk, beating well after each addition. Spread batter over peaches.


    3.  Bake at 375 degrees for 35 to 40 minutes, or until lightly browned on top. Remove cake from oven, and let stand in pan for 5 minutes, then invert onto serving platter.  Serve with whipped cream.


    Let sit for 5 minutes before inverting onto serving platter. 


    SUSAN'S NOTES: I got in a hurry and didn't cream the white sugar with the butter but I had melted the butter and just mixed it all together. Sometimes recipes get a little too complicated for no reason.  Just put the stuff in the bowl and mix it, no alternating the milk, etc. It turned out just fine!! Also, I doubled this recipe when I made this batch (9/18/11)

    Thursday, August 18, 2011

    Bread and Butter Pudding

    This is a recipe Justin's Grandma Smith gave me. It's so good you'll want to slap your grandma (figuratively speaking, of course!)

    Bread and Butter Pudding

    3 cups bread cubes (about 5 slices) toasted
    Enough butter to spread on toast
    1/4 cup raisins
    3 eggs
    2 1/2 cups milk
    3/4 cup brown sugar
    1/2 tsp vanilla
    Dash salt
    Dash nutmeg

    Instructions:
    Butter toasted bread and then cut into cubes
    Layer bread cubes and raisins in a 1 1/2 quart casserole. Set aside.
    In a different bowl beat eggs; stir in milk, sugar, vanilla and salt. Pour over bread. Let stand 10 minutes.   Sprinkle with nutmeg.  Place casserole in shallow pan.  Place in 350 degree oven.  Fill pan with hot water, about 1 inch up sides of casserole. Bake 45 to 60 minutes until custard is set.  Serve warm.

    Makes 6 servings.
    Notes:  I used wheat bread. The staler the bread, the better. It's a good use for stale bread and milk that's about to expire.

    WARNING:  Do not make this if you are on a diet. It's irresistible.

    Sunday, February 27, 2011

    Linda's Little Pastries

    Our friend Linda is the most fabulous cook! She makes everything look so easy. While we were staying at her house recently (Feb. 2011), she made these little pastries. I snapped some photos while she made them so I will remember to make some of my own.


    She told me you can use any kind of canned pie filling, for the centers. 

    In this instance, she found some canned strawberry pie filling.  These are so yummy!  I can hardly wait to make some for Gene.  She said she usually uses a little egg white to "sew" the pastry together but didn't this time so they baked open.

    Just use some phyllo dough, roll it out, and cut with a round glass. Add filling to the center and fold over and bake.  I think she heated the oven to 350 degrees. She never uses a timer so I'm guessing these baked about 15 minutes. I'll update this recipe once I try them myself.

    Thank you, Linda & Mike, for being the most gracious friends and hosts for us weary road travelers.  We love you!


    Friday, February 4, 2011

    Fudgy Cocoa Brownies

    Fudgy Cocoa Brownies

    1/2 cup (1 stick) softened butter or marg.
    1/2 cup Cocoa
    1 cup sugar
    2 eggs
    1 tsp. vanilla
    1/2 cup flour
    1/4 tsp. salt
    1/2 cup chopped nuts (optional)

    Gently mix all the above together but don't overmix.

    Spread into an 8" x 8" pan sprayed with Pam. Bake at 350 degrees 20 to 25 minutes until toothpick inserted in center comes out clean.


    HOME-MADE ICING:  1 cup powdered sugar. Add milk a couple of tablespoons at a time until consistency you desire. Pour over cooled brownies and let icing stand. I like it really thick so my brownies are on the verge of being fudge!  Make sure you have ice cold milk in the fridge to wash these down.

    Note: I prefer to make anything from scratch. There are so many things that are easy to make from scratch instead of opening a box and not knowing what they're putting in our packaged food these days.  Hope you'll try these brownies!


    Mixture is thick.

    Remember, these are "fudgy" brownies. Mixture will be thick.

    Thursday, December 23, 2010

    Chocolate Covered Marshmellows w/Coconut

    This is a made-up recipe.  I had leftover almond bark I needed to use up so I dipped marshmellows in it and then rolled them in flaked coconut and let them harden. 

    It's a new kind of YUM! And they're so cute!

    Microwave Peanut Brittle (Easy!)

    I had never made peanut brittle before but a friend encouraged me to try the microwave recipe.  It turned out perfect and was so easy & inexpensive to make. I bought the raw shelled peanuts in the bulk section at the grocery store.  If you love peanut brittle, I hope you'll try this easy recipe.

    You'll need:
    1 cup raw shelled peanuts, skins on
    1 cup white sugar
    1/2 cup light corn syrup
    1/8 tsp. salt
    1 tsp. butter
    1 tsp. vanilla
    1 tsp. baking soda


    • Stir together peanuts, sugar, syrup and salt in a 1 1/2 quart microwave-safe container. Cook 8 minutes on high in microwave oven, stirring well after 4 minutes.  
    • Stir in butter and vanilla. 
    • Microwave 2 minutes longer on high.  Add baking soda and quickly stir until light and foamy. Immediately pour onto lightly grased baking sheet.  Spread to 1/4 inch thickness.  When cool, break into pieces. Store in airtight container.  Yields about 1 pound.
    • NOTES: you can add cayenne pepper or jalapeno pepper to this to make it spicy. I advise also adding a few drops of food coloring to distinguish the spicy candy. Not everyone loves sweet, hot brittle!

    Saturday, December 18, 2010

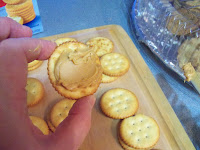
    Chocolate Peanut Butter Ritz

    I don't recall who showed me how to make these, but I would give them a hug if I could remember. This easy recipe is a favorite of all the men in my life.  It's so simple, (blank) could make them.

    You need:
    Ritz crackers
    Creamy Peanut Butter
    Almond Bark
    Wax Paper

    All you do is spread the peanut butter on Ritz cracker, smack it together and dip it in melted Almond Bark. Place it on wax paper and let them set. You can put them in the fridge to speed up the process.

    You can add stuff to top like drizzle white almond bark quickly for a really fancy look or add sprinkles. We like 'em plain.


    Saturday, October 23, 2010

    Caramel Corn

    Gene, my dad, and Justin love this recipe. You'll never want to buy expensive caramel corn again after you try this easy recipe.

    Caramel Corn

    1 cup margarine or butter
    2 cups brown sugar
    1/3 cup corn syrup (light)
    1/2 tsp salt
    ************
    1/2 tsp baking soda
    1 tsp vanilla

    Boil the first 4 ingredients for 5 minutes (set the timer when it comes to boil)
    Remove from heat and stir in baking soda and vanilla.
    Pour over a big bowl of popcorn (2 batches of popcorn and make sure to remove unpopped seeds)
    Spread on a big cookie sheet and bake in preheated oven at 250 degrees for one hour, stirring every 15 minutes.
    Cool completely and store in zip lock bags. Very addictive ~ you may not even need zip locks because this won't last very long.

    Optional:  you can add peanuts to make this even better!

    Monday, October 11, 2010

    Kawaii Banana Bread (Adelle handed this down to me)


    2 cups sugar
    1 cup shortening (or 1 cup vegetable oil)
    6 ripe bananas
    4 eggs
    2 1/2 cups flour
    1 tsp. salt
    2 tsp. baking soda

    Mix.  Bake in greased pan for 45 to 50 minutes, depending on what kind of pan you use.  I like to make Bundt cakes or bake in a regular cake pan. You can make loaves with this or muffins. Adjust cooking time.

    (Freeze your brown bananas)
     TIP:  When you have old bananas, simply throw them in the freezer right in their skins. They keep a really long time that way. When you have enough to make banana bread, set them out on the counter for an hour and then simply cut off the top of the banana and slide the fruit out. It looks very gross and slimy but TRUST ME the browner the banana, the more flavorful the bread.

    NOTES: I have always made this with shortening but I recently tried it with vegetable oil and it turned out beautiful. I would replace the shortening with oil as it is much healthier. I also baked this in the convection oven and discovered I need to shorten up the baking time when using that the convection oven. Need to check the bread at about 37 minutes.

    HISTORY OF THIS RECIPE: Adelle was my mother-in-law. She was one of the most wonderful women I've ever known. This recipe came from one of her relatives who live in the Hawaiin islands.  I don't know why it's called Kawaii bread. She passed on many recipes to me and we spent a lot of time in the kitchen together. She was a fabulous cook and often my son and I laugh when we think about how much she loved her butter. We miss her very much and wish we could see and hug her just one more time.